Inserting tabular data into a document template
Most fields available to document templates are mapped onto placeholders in the template on a one-to-one basis; that is, one piece of information from ContactsLaw onto one placeholder in the document. Sometimes, however, it is desirable to create a composite field where several (related) pieces of information are mapped onto a single placeholder. In the special case where a composite field is needed with the goal of creating a table-like structure in the document, ContactsLaw provides a table editor to simplify and streamline the process.
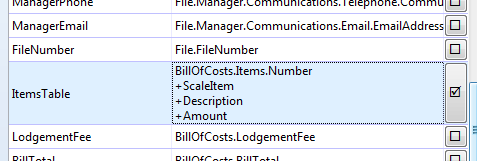
 A composite field is displayed in the document template editor in a multi-line fashion, as above.
To create and populate a table of values in a document template, you have two options:
Method 1 involves defining a series of tab stops in the document. When data is inserted from ContactsLaw, tab characters will be inserted between each segment of the composite field, aligning with the tab stops in the document. This technique works for the majority of template formats. The steps required for this method are:
- Create a placeholder for the table in the document
- Add column headings above the placeholder
- Set tab stops to ensure that values will be spaced correctly
- Use the table editor to map the values for each column onto the placeholder
Method 2 only works for Microsoft Word and Excel templates. For this method, a Word table is placed in the document template with a placeholder in the cell you wish to begin inserting data from (or, in the case of Excel, adjacent cells in the spreadsheet are used). The tab characters inserted between segments by ContactsLaw will be treated as column delimiters and new paragraph characters will be treated as row delimiters. The steps required for this method are:
- (Word only) Create a table which contains the number of columns you desire
- Optionally add headings for the table
- Insert a placeholder into the table at the cell you wish to begin inserting data
- Use the table editor to map the values for each column onto the placeholder
Notes for Method 2:
- To insert data between table rows, split the table into two smaller tables.
- If the table contains merged cells, this method will fail. As an alternative to merging cells, split the table.
Using the table editor
You can open the table editor by double-clicking a mapping in the document template editor, or by right-clicking and selecting the 'Table editor' option. The editor will show any existing mapping in a visual manner, with delimiters shown using appropriate symbols.
You can add fields to the table by dragging them across from the document template editor, or by using copy/paste. When you drag an item into the table editor, an insertion mark will appear below the cursor, indicating where the field will be placed - drag around the editor to move this. You can also re-order fields using this mechanism.
Right-clicking one of the delimiters between segments will allow you to select the type of delimiter you want to use; in most cases, a tab will be most useful. You can use a new paragraph character to prematurely break onto a new row. You can also use your own custom delimiters (for example, multiple tabs to skip over cells).
Example of the table editor in use - a combination of delimiters have been used (a hyphen and tabs). Note the paragraph separator between each row.